How to fix the Corsair mouse scroll wheel not working or erratic behavior
Corsair Sabre Pro Gaming Mouse partial disassembly (model # RGP0091 and perhaps similar models with similar problems)
How to open the Corsair Sabre Pro Champion Series mouse in 7 steps:
- OPTIONAL: In the front of the mouse, carefully but with some force lift up vertically each mouse button until it clicks remaining upward which will help expose visibility of the locations of 2 non-removable clips on opposite sides of the mouse usb cable that are part of the bottom half of assembly.
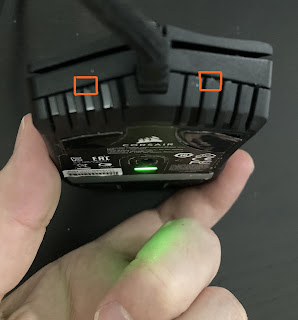

- Insert a screwdriver or plastic wedge tool between the front and bottom assemblies to gently pry apart the top and bottom halves while also pushing forward on 1st clip location to push it back just enough to make clearance for top assembly to gap apart with some force from inserted 2nd screwdriver or plastic wedge tool to assist in separating top and bottom half assembly. WARNING: The clips are plastic and part of the bottom assembly itself. They do not remove. They only need to be pushed inward to allow clearance for the top assembly to not touch the clips, while the top assembly is being pried upwards with the 2nd screwdriver or wedge tool that can fit between the gap of the top and bottom assembly.


- On the opposite side of the mouse usb cable, in the 2nd clip location, do the same by gently pushing forward into assembly gap in the 2nd clip location while working your wedge tool or screwdriver to gap apart the top assembly.
- The top half should be gapped enough to be able to be pulled upward with some force to expose the front portion of mouse to clean the scroll wheel area, its blue button clicker, as well as remove lint or debris with compressed air or blowing into the right side of scroll wheel and its silver-colored covered sensor.
- To begin to close the mouse, the best trick is to push downwards on the rear back of the top curve about 3 centimeters from the rear edge of scroll wheel (or 2 centimeters forward of the Corsair RGB logo). Warning: Do not push downwards on the front of mouse just yet.
- With the main body now nearly closed and only a small gap remaining in front (because of clips), gently press down on each button and along the front edge of mouse until both clips are clicked back into place and the front assembly gap is again thin as originally assembled.
- Plug in the usb cord and test functionality of all buttons and scroll wheel.


Summary:
There were no screws at all under the 4 plastic skids in bottom corners, nor were there any screws under the rectangle grey slide pad when I removed the pads to try to find screw locations. Other mice I had prior did have screws under skid pads, but not this Corsair mouse model. The only way I could find to open this mouse was with careful 30x magnified inspection of gaps around the mouse which eventually allowed me to see the front clips between the assembly gap. With some risk to breaking the mouse, I decided to see what happens if I lifted the front of each button and to my surprise each one clicked upward and stayed up to allow visual inspection of the clips and how they worked.
I did not go further in full disassembly of the mouse. My mouse stayed hinged in the rear near the RGB Corsair logo which likely had some kind of retention or clip as well. I only wanted to access the front and scroll wheel area in hopes of fixing the slow sluggish response of the scroll wheel in this Corsair mouse.
My mouse is now fully working as new again after doing this partial disassembly and cleaning with air and a bit of rubbing alcohol and a cotton swab along the scroll wheel axial. Enough that it allowed me to easily compose this blog post and scrolling through it now perfectly!


Comments
Post a Comment